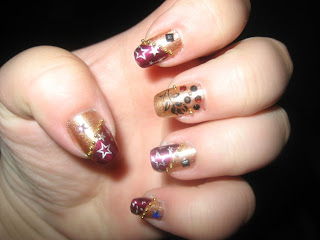
It is about time to revel the secret of the kitty nails. In fact the base color for kitty manicure is my first official franken polish.
So after spending hours and hors trying to create somehting at least close to nice, and number of fails, i came up with the better idea. if you cant do soemthing ,see how others do it and do the same. I was admiring this color for a long time, since i seen it on Dr.Frankenpolish Blong , so decided just follow instructions given where. Except i used my own polishes, which are close in color to whose that she used, and i did not add any clear polsih, because i want it to be opaque.
May be one day i ll be able to make somehting myself, but so far, at least it worked, even that the idea is not mine. Thank you Dr. Frankenpolish - to be my guide on frankening.
One bottle used and 3 to go, stay tuned for more Franken Polishing experience
Search This Blog
It is all about Hello Kitty
This is just one of whose manicures that no meter what, i just can not wait any longer to share it with you. I will revel some details about polishes i used here tomorrow. The only disappointment is that "giant stamping Kitty" fits only on 2 of my nails, i try really hard to do the same design on all the nails, but i gave up after many times, it just too big :)
FrankenPolishing Expirience - Part1
This is going to be a series of post about my experience with frankening polishes.
I was always inspired by people making their own polishes, especially i admire work of Frankepolish blog, and want to thank her for useful tips.
So i always wanted to try it - because it look like really fun to do, colors can be wonderful, and does not look to hard to make. (he-he)
Since i am not sure how it all going to turn in, i decided start to do it with the supplies i have, without ordering additional stuff. ( partially the hole decision to franken is based on the economical situation in my valet)
In this part i will provide you with some tips how to clean old bottles from polish, so you can use it for frankening,m instead of order empty bottles. It is not really hard task but require some pation :) Another good reason to start with old bottles, is because you can use smaller size bottles which will require less supply waste.
I started with picking some smaller size all polishes, and when added acetone to it. Actually to simplify this task i made a cone out of old coke can, just cut it with scissors.
i let the the polish melt for about 20 minutes and then located it upside down to let ti float from the bottle. You ll need to repeat it several times,letting it melt for 10-20 minutes each time acetone is added. I was afraid to drain this stuff in the sink or toilet ( glittery toilet is not my big dream lol ), so i used another coke can. it is also very cool that you can leave the bottle upside down, like this
After all those precedures you ll end up with clean enouth bottles that can be used for frankening and expressing your creativity
However i realized that i totally suck in mixing polishes.. i spent like 4 hours playing arround with samples,and i didn't like a thing... really, this is not as easy as it may look. So stay tunes for Part2 , to see if i can make anything to put in my clean bottles.
Last Dream in the Morning
This manicure reminds me of something light and fragile, that will just fly away from you forever if you ll try to catch it.
The base color is Essie "Carousel Coral" - amazing color, that i love so much, but cant use often, since it goes with nothing from my cloths or accessories, and not in my color type pallet. But i still just love it, and enjoy it on my nails from time time
In Memory of Michael Jackson
Silver Fantasy
This si another gradient that i made using zoya Kotori. It come up not that visible on the pictures, but in fact the gradient from dark dark blue to the lighter shade and glitter is in fact very noticeable, and even my friend asked me how i made this effect. The darker base is Zoya indigo, and then i put the layer of Zoya kotori starting from about 1/2 of the nail. Again, the koni on the top, helps to smooth the gradient.
More manicures are coming up this weekend, so stay tuned, for the review of the Zoya french manicure :)
Dream Cancun - Vacation Eddition
Oh my goodness, i want to go on vacation so bad, that i even draw it on my nail, to make me feel more like vacations. Does many of you are planning on beach vacation this summer?
I still don't know if something will work out for us, we kind of looking, but did not even decided anything seriously. All i can dream about right now is to be under the palm tree on the sandy beach :)
My husby is from Florida, so he does not really understand why i am so crazy about big water and palms. I am originally from a cold region of Russia, and the closest big water is 5 hours fly - and still it only will be arctic ocean. So palms for me is something really really cool. Haven' t seen it a lot in my life.
San-Fran-Nails
Funky nail art on the mirror image base . This mani reminds me hippy , summer , and joy. Unfortunately i have incredibly bad mood today, after visiting a dentist, so i just wonder how could i come up with something that cute and happy on my nails? I guess "poet needs to struggle" ( i don't even know if where is a saying like this in English language) .
Anyway , i think that mirror image is so much fun, and i totally love it. I wish i can buy some more, because i am scared to run out of it.
My dream polish #1 right now, is any matte, i d kill for one of those. But can't really get any right now, unfortunately.
Anyway , i think that mirror image is so much fun, and i totally love it. I wish i can buy some more, because i am scared to run out of it.
My dream polish #1 right now, is any matte, i d kill for one of those. But can't really get any right now, unfortunately.
Pick a Look
This modest cherry design is inspired by Brooks Cherry Pop
However my interpretation is much more modest ;)
I am in deep trouble, because my wisdom tooth is growing and it bothers me a lot, in fact it hurts like a hell, and i am too busy to handle a dental surgery right now. But i gave up, i have an appointment tomorrow, and will wear this manicure for the execution. I have a dentist phobia, seriously. I am very very scared.
So here is mani without glitter and on the following pictures i enhanced the look with glitters. Which one do you like better?
Nials goes wild
Yeas, this manicure has gone really wild.
I ll be honest, this is totally not my idea of doing this many, i have seen the picture of many like this online, but i can't find it anymore, no mater how hard i try. If i ll find it, i ll post the the link to the original picture. And honestly the original looked the way better then mine. I guess it is due to the nail size again.
Anyway, i know its a mess and it s wild, but i just totally like it, it looks really cool if not look too close
Metallic Gradient with Zoyas
For this manicure i used Zoya "Trixie" ( metallic base) and Zoya "Hyaden" (pink finish) .
First i covered nail with base color and then created gradient with pink transparent polish:
-Paint about 1/2 of nail with one thin layer of pink
- Add intensity with additional layers of pink on about 1/4 of the nail.
Metallic look really helps colors to look smoothly blended in each other. And the best thing is that this work really really great with almost all Zoya polish that i have, since they all are very transparent. Some design on the top also helps to smother gradation look.
Zoya Indigo
What a gorgeous polish - Zoya Indigo is a base for this stamping. I love love love this color :) I just realized that i recently have been getting a lot of dark blue polishes - is it some kid of "in search for perfect" type of thing?
Stay tuned, where are some more gorgeous manicures coming up, including metallic and glittered gradation made with Zoyas.
Forest Night
I apologize for the delay with the post. Here is what i have for you today - Green manicure with silver stamping.
The base coat is Zoya Suvi - and this is 3 coats of this polish, because 2 are not enough for good coverage. However i found a really cool use for all those transperent zoyas, and the post about it is coming soon.
For stamnping i used silver polish from Maybeline mirror image set, which happen to work really great for stamping even without base.
Subscribe to:
Posts (Atom)