Search This Blog

Showing posts with label Flowers. Show all posts

SAVE THE EARTH

Hi guys,
As of now, I don't have new nail art. I just like to share the freehand nail art that I made. I entitled it "SAVE THE EARTH" the girl in the center is holding the earth and dying tree.. It shows mother nature before and mother nature as of today... It's not actually that noticeable because I was in a hurry to finish it but I hope you guys like it!! =)
God Bless
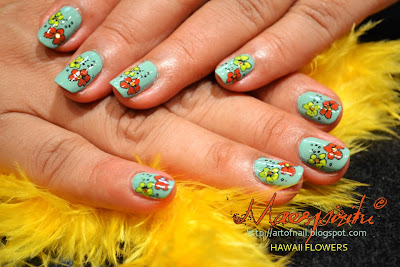
Nail art I made for my aunt.. =)

KkCenterhk Nail decal tutorial

Hi guys, I received a pack last week, decals from KkCenterhk, it's just now that I was able to make a review of it because last friday (august 5) my son Jaem celebrated his 6th bday. I was so busy then, and this week is his 1st periodical test.. Happy birthday to all august celebrants... Anyway here's the decal design I picked to review, I chose floral design.. As you all know I really like bright and lively colors ( mainly green!)..

NOTE: This product was sent to me as a gift. I made this review based on my own ideas and preference on how to use them. My opinions about the quality of the said products are based on my personal judgements and the outcome of my usage.


X&D nail decal is very fun and easy to use.. You don't need to go to a salon,

all you need to do is.
1. Clean your nails, remove excess oil, and buff it. It's up to you if you want to use basecoat or not.
I used china glaze for the base. Let dry.

2. Remove the thin protective plastic cover and cut the decals.

3. Soak it on water for a second.

4. Place it on your nails and remo
ve excess water.
5. Use nailfile to remove the excess decal. Add top coat.

Tada!

And here's the finished product. Save time and money!
You can purchase X&D full nail art water decals for only $4.50, just visit KkCenterhk for more nail and beauty products.. Hope you like it! God bless...
P.S happy birthday to my niece Cielo. She's celebrating her bday today.. this mani is for you and for all those who are celebrating their birthday! God bless...


As pastel as it gets :)

Here is a nice pastel nail design that i made yesterday. By the way i used green franket that i made earlier to draw the flowers. Aren't those both colors goes just so cool together?
Just in case someone still don't know how to draw flowers like this:
1) i used the tooth picks for dots and for marbling, since i don't have real tools
2) to make dots i just cut the end of the toothpick with sezards
3)First let the base color dry, then make a dots, and marbl it toward the center while it is wet.
4)The center may look little ugly, this is why you ll need to put another color in center
5) Let your flowers dry well and only then apply the top coat, if it is not dry, top coat will wash out the texture from the leaves.
6) Try it, it is really easy. Have fun !


Very Spring mood

Despite the fact that the weather is kind of cold and nasty, the mood is very spring and green, i wanted something very green and sparkly. As a base for this stamping i used the gradation technique in green color, then i put a sparkle top coat that i have got from Brook ( hey, Miss winner - congratulations with you first place!) and that i am deeply in love with since i try it . nest step is stamping the flowers and then i spiced it up with the little green stars. I really love this design, and really wanted something that does not scream - IT IS EASTER :) So i save my Easter inspiration for eggs, but spring inspiration is here - on my nails.


Some toe nail-art

My friend Lena have visited me today, and certainly i did some design on her toe nail, since her job require her not have anything on her finger nails.
This is what i came up with.
In the beginning idea was different, but she is a very picky "client" , she like things to be done her way, so i had to find a compromise. But in reward she broth me some dry flowers and other decoration stuff.


Flowers

Whose 2 design are based on the same idea of dots. The best way to make dots like this is cut the end from the teeth pick :)
It ujually works good on my tinny tyny little nails, but to be honest i didnt like both of those , but, you judge yourself


Tender pink nails


Could not resist to try my stamping kit again! I am absolutely in love with tis product. This time doing those nails took me about 20 minutes only. I found online an advise to use stamping kit with the turned off air condition.Sounds crazy, but this time it all worked just fine, even the green side of the stamper. And also this time i made much less mess. The trik is to use a paper towel to clean the scraper instead of the cotton party, so the fibers wont stik on the scraper and image plates. I am absolutely in love with my nails with this design. Base coat is Loreal 230


Toe Nail Design

Some cool summer designs for toe nails that i made today for me ( green) and my friend Lena.
Both designs are wet manicure flowers, just with the different colors.


Flowers on the nails

Inspired by the flower that drow to Oksana, did those nails for myself. May sounds silly, but i really for years didnt know how to drow the flowers like this, even thouth i knew the "wet manicure" method. And i am not a big fan of wet nails, because it is messy, and hard to apply on my smoll nails. But this flowers openings and new horisonts for wet technics now for me, and i allready ahve an idea that i will try preaty soon.


Flowers for Natasha


It was not easy to make this girl trust me that even dark colors may look very beautiful on the nails, especially with nice design. I met a lot of girls who prefere only light and neutral colors, especialy most of them like perl polishes. But as i know from my own expirience, perl colors are not the best for drowing something on it, so for the basic color i mostly try to use matt colors

Very beautiful flower design